Sunday, October 16, 2011

It's a BOY!!!

This weekend was our first opportunity to find out what the new little CRUM would be. My sister in law found out she was pregnant this summer and I have been patiently waiting to find out what the sex would be.......... If you know me you know that I would have wanted pink, but I am happy to have a healthy baby boy coming in early March of next year.


Landon Heath will be here before we know it!!


Yes that is the grandpa to be sitting in his Rocking Chair that will be a special addition to Landon's Nursery. We have had this chair in the family for many many years. It has rocked several little ones to sleep, including myself.

Since we didn't know the sex until this party we decorated half pink half blue.


I love it!!! Everything you see here was purchased at Hobby Lobby. The plates and napkins and the signs up top were all on sale!!! HOLLA!!! The cookies were made from a local lady who does all our parties. They look great and taste even better!!


Cassie and Heath had ordered several dozen cupcakes that were frosted and then piped with the color of blue for everyone to bite into. The perfect way to celebrate an announcement of a birth!!


They were YUMMY!!!

Once bitten, the color couldn't be any more blue


While I was at school on Friday, Cassie sent me a text after their appointment. Here's what it said..

GRRRRRRR!!!!!!

It was an amazing party, with lots of friends and family members there to celebrate the luckiest little boy!!! He already has some custom baby outfits made by the incredible 

AMY HAMPTON-TERRIAULT


 Find her on my facebook friends list.

Here are some more pictures of the party....


 I ran out of my white glitter, so I used cupcake sprinkles for the blue B!! No one ever knew!!!


Preview for Halloween

This is what I have so far.......


I need much much more!!!!

Sad Day...Model Home being sold....

This was my first big job, 4 bedrooms, flex room, formal dining and spacious kitchen. I will miss this place....


 This dining set was found at an antique store and has velvet green fabric.....TO DIE FOR!! The wrought iron gates on either side were a vintage find for $35!!! AMAZEBALLS!!


Love this master suite, this bed just screams jump on me, but don't since it's a model home. We'd have to remake the bed!!


 Love the little boys room, very patriotic. Honoring the soldiers located nearby in Ft. Hood. Military gear found at local army surplus stores. The decals were a bonus...Target!! Yes please!!! The picture of the pig running and jumping into the pond is by far my favorite picture ever...Shows complete joy!

And my favorite table ever, except for mine of course!!

Sunday, October 9, 2011

Creating A Sales Center


Curtains all handmade. Pillows handmade. Pin board in breakfast area handmade. Obviously the color theme is YELLOW AND BLUE!! I love the chairs that have been embroidered to show family names. Lamps were brown and red and were sprayed to a matching blue.


Creating Holiday Cheer

So, I was in Canton last month, surprise surprise, with my boo Amber. We were doing our thing we came across this cute little booth that was heavy with Halloween decor. We found these cute little candy corn wood cut outs that could be personalized for any occasion or name. I don't know why I put occasion, whose gonna put happy St. Patrick's Day on a candy corn painted in fall colors. Anyway, we decided to get us both one with our last names. We wanted to make wreaths for our doors. Well I was going to make my parents one and lets face it, I was going to make Amber's too. Love her to death, but she is as creative as her husband.......Just to give you an idea of this trip to Canton check this pick out....


There was literally no room to see out of the rear view mirror!! With that being said, it was a very successful trip!! Alright, back to the whole point of this blog........A Holiday Wreath!

We bought some grapevine wreaths in Canton for like $4 a piece, if you look up, you can see them in the back of Amber's car. Great deal on such large door wreaths. From there I went to one of my favorite stores ever, Hobby Lobby, to pick up several pieces of fall decor to add to the wreath and our cute Candy Corn Name Tags.


As you can see there's a whole lot of mess just waiting to happen. And right in the middle is my best friend for the day, my glue gun. If you look closely, you can see the candy corn. This was a real beast to add to the wreath since I was trying to glue wood to sticks. Not the easiest combination. With a little wire, and a whole lotta hot glue, that baby isn't going anywhere. Depending on how you want your wreath to look depends on the color of greenery and flowers you buy. I purchased small pumpkins, dry grasses, a few feathers and lots of orange and red berries and a few hydrangeas. Putting it all together is rather simple. Just start adding to it with all your accessories making sure one side isn't heavier than the other. Remember it's just glue, so it can be ripped off and re-applied elsewhere. Also, less is more is out the window here. We want to make a statement from the street, so a few pieces wont do the trick.


As you can see I have grasses coming from behind the name late and feathers on the other side for balance. all the colors mesh well and the only thing that sticks out is the name plate!!! PERFECT!!

It literally took me about 15 minutes!! Delivered it to the parents house and viola!!!


Thoughts.......


Oh and I did this one too.....


Thursday, September 1, 2011

From Craigslist to Greg's List(of amazing transformations)

Do you ever walk into someone's home and see things and think.."WHAT IN THE WORLD"? Well, I do. All the time. I can't help it, I have been doing it since I was 10. In this case, my friend happened to have purchased on of the most boring dresser's that I have ever seen. Not only did she get it off Craigslist, it happened to be from IKEA. Now don't get me wrong things from IKEA can be great and I have found some interesting pieces off Craigslist, but this, my friends, was just one big blonde mess. Let's not forget to mention that her CHI WAWA, who pee's on me every time I come over, chewed up one of the bottom corners.


It's hot right? My friend who was already spending a fortune on buying all new furniture was going to toss this aside. I told her it could be salvaged not knowing what was in store for me. Sanding, storing it in my garage and best of all, the most ridiculous old lady EVER!!


As you can see from my friends dog and husband I had plenty to do.


The first thing you want to do when sanding faux wood is to be very careful. You can't afford to sand all of it down. Just enough for the paint to soak in. And, you want to leave it enough so when you finish painting you can go back and sand/nick the corners for some added distressing. Sanding the edges of drawers and doors is the easiest way to add that eclectic look to any piece. The more practice you put into refinishing furniture the better you will get!! I painted this with our our favorite Churchill Almond spray paint from Home Depot. It is a very warm almond cream-ish color and when paired with our Minwax stain it gives any piece a very worn, old look. I used a light sanding strip with my handheld sander for about 5-8 minutes on the top and sides. Less time for each drawer and door. Remember, MDF will sand away if you are not careful. All the worn edges were easily sanded down with minimal wear from that damn dog. Did I mention when I was dog sitting that POS took a piss on my pillows. It's taken a long time, but I like that dog. Barely.


The drawers had half moon pulls that were not standard size which made for a very, VERY difficult time finding replacements. Why you ask, because my friend threw them away. I wont go into the how difficult that lady was that we bought all the new pulls from. I wish I had a video of her when she was talking to us. I really do. Tongue hanging out when she went for a drink from the straw, Jerry-curl tight and barely hanging on and she was sweating like a pig. Ugh she was something else. 


So, see I still have issues with my ADD!! Ok, so after we sanded, painted, painted some more and stained it, we had an end result of this.


As you can see, I used as much stain as I could to get into all the cracks of the doors. It really does give it that aged look that we were going for. The harder you rub the better outcome you get. I like to put on a lot of stain, let it sit for about 30 seconds and then start rubbing. It smooths it out and the rag picks up all the excess you don't want on. Make sure you use gloves our your pedicure will be ruined. Just ask Amber, I mean my friend. This piece is opposite of the beautiful headboard I posted on one of my previous blogs. It matches my friends husband's night stand. It stayed just like this until we found those knobs from the ridiculous lady in Canton. Every time we walk by their both a migraine starts to form. It takes a hot pretzel and a cold Dr. Pepper to make me feel better!!


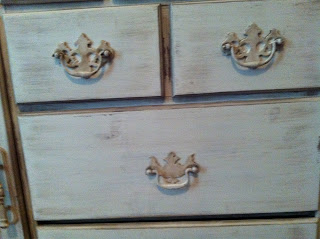
As you can see, we went with several different pairs of knobs to give it an eclectic look. I loved this idea, mainly because that old lady didn't have enough of the same for all the drawers and doors. But in the end it turned out well!! The larger drawers match, the 3 smaller drawers match, the 2 drawers underneath match and the deep drawers at the bottom match. We ended up going with pulls for the doors to give the piece some more definition.


So, what do you think????