Sunday, November 4, 2012

Bath Time...


Can we take a moment and appreciate the cuteness that is my nephew Landon? You never understand what a baby will do to you and how it will affect your everyday thinking. I can't explain it, but when I look at this kid I tear up. When I hear his precious laugh, I tear up. It's a raw emotion that one day will touch everyone, it's called LOVE. We will experience love in one form or another and right now it's not someone that I expected it to be. It's my nephew and I'll never apologize for what I do for this guy. Pouring my creative abilities into his life has been nothing but fun for me. We have all seen his bedroom...AMAZING, right? I've been working on finishing up his bathroom for sometime now but until it's 100%, I can't stop. We will remember the inspiration...


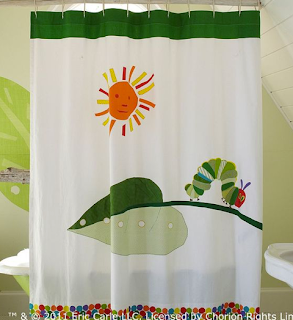
Very un-original I know, but the colors are so vibrant and fun for a youngin that I wanted to have spaces for Landon where he can be a kid and enjoy life. I purchased the book, butterfly, and Caterpillar from Barnes and Nobles. The book was inspiration, art, and decor. My best friend/assistant helped me cut out all the photos of the book so we could frame and hang the art all over the room.


Pottery Barn had the shower curtain, so it had to be ordered. They had plenty of items to order to help decorate a room, but come on,  I had to come up with some of the creative side. 


CUTE, RIGHT?

After hanging this, with lime green plastic rings from Wal-Mart, I got started on shopping for all the accessories. I bought several colors of towels from Wal-Mart, THEY ARE CHEAP, colored ribbon from Hobby Lobby, colorful frames from Ikea, a white plastic trash can, mini assorted colored poms from Hobby Lobby, trusty glue gun, and the perfect stripped rug meant for a bedroom. 


Lots of...everywhere

I actually bought cheap frames at WalMart and thought I could spray paint them to make pop from the walls with the art from the book in them. DID NOT WORK OUT WELL. That's why I bought the frames from Ikea. I glued the poms in random patterns all over the trash can and I think it turned out really well. 


I hung the butterfly near the shower curtain and suction cupped the caterpillar to the mirror. The towels were purchased so there would be pops of color all across the room. Blue by the sink, orange on the towel rack above the toilet, yellow across the toilet, and green for the wall above the toilet. 


The greens have not been hung yet, but I added this thick paper raffia ribbon around them with his initial in the middle. Yes, to answer your question, none of the towels are meant to be used by anyone. They are for decor only. :)

The pictures have been hung in random locations so when you look in all directions, you see fun and color.


It's still a work in progress, but it's coming along rather well. I think Landon will appreciate what he has when he grows up and understands what's around him. More pictures to come...


Saturday, September 29, 2012

Feeling it again...


It's been so long since my last post and it's been a long time since I've truly felt the urge to be creative. I don't know if it was the rain or the company, but I felt the need for speed, I mean the need for a glue gun. Loaded up the car, headed to Hobby Lobby, and went to town. Spent $80 on materials and started crafting an idea. Get it, crafting...

After I got home I had to lay everything out. I have to see everything so I don't forget to use the unique things that make my projects what they are.

The always important glue gun, never craft without one.


After you lay everything out, start with a ribbon. I purchased 3 colors but only ended up using the burlap. I started at the top and worked my way around making sure that both sides looked even. Please not that I did not use your everyday round wreath. I wanted to do something different, something you don't see often...Jenny Peel, used this same style for a Christmas wreath and it was stunning! That's the beauty of crafting, there are no rules to it!!


By the time you get it around the wreath you'll need to tuck it within the sticks to help hold it's place.
I like to add some spots of hot glue to help keep it's place, and no one will ever see it since it's on the back of the wreath. 
 Once you have the wreath covered in ribbon like you want it, start playing with positions of your decor. I like to mix and match items to give an eclectic look. Fake floral have stems that are perfect for wreath making. Use the stem to latch onto a branch to hold in place, add a little glue and bam it's not going anywhere.


 These circular twigs were behind the maroon flowers I bought. They became a perfect backdrop for the berries. I also used the pictured leaves to add texture with the berries and twigs.


As you can see, the circular twigs, acorn, hidden leaves, and some last minute feathers really add to the right side of the wreath.


The flowers worked out great!! They were easy to rip from the stem they came on and by positioning them with a muted orange pumpkin, it really draws out all the fall colors. The mini berries are from the large stem pictured below. I just ripped them from the vine.


The letter S is for the clients last name and we used a deep red to help carry the colors all the way to the other side.

 
Personalizing your wreath is simple!! Add the letter of your last name in front of a big bow
 and you have an instant personalized wreath. I finished it off by combining like colored pops of decor that anyone who walks by this door will be sure to stop...


I am in love with the finished product! It doesn't scream Halloween, but it does say we ARE ready for fall. The little witches hat is for the S when it does get closer to Halloween. Slip it on and it's now a fun dressing for a true spirited wreath. It also helps to use colors that will transition well into other seasons. This will last until December. It's [perfect for October and November and with a few little updates, it's a Thanksgiving wreath.

Let me know your thoughts.

Thursday, May 10, 2012

Flying High in Landon's Nursery

When Cassie and Heath told me they were pregnant I had 2 reactions.
1st reaction = gasp
2nd reaction = IT WILL BE AN AMAZING NURSERY!!!!!

The only issue was, what theme to go with. Monochromatic gray and yellow,  Sock Monkey, Sports Themed and Young Pilot. I wanted Monochromatic gray and yellow...

We went with Young Pilot.

My first bit of inspiration was this 6' x 6' mural of a vintage flying plane. This image really does capture the true colors of the real thing.


As you can imagine, I went balls to the wall in my shopping. Anything and everything in the red, brown, tan, and blue tones. Airplanes galore, books, fabric, accessories, toy storage, and everything cute and unique.

Unique items like this that you would ordinarily see in a nursery are touches that set Landon's nursery apart.


This airplane shelf came from one of Cassie's showers and it couldn't have been better!! It literally looks as though it's flying out the wall. I love Landon's height chart. I found this on ETSY during Cassie's 1st month and could wait to order it when I knew it was a boy!


I think every room can benefit from a pin board designed to match the colors of the room. This pin board was found at The Home Goods Store and was actually a sea-foam green. After it was painted a midnight blue, I added burlap to the cork backing for texture and that tan/brown color effect. I used simple dark navy ribbon with red piping on both sides to pull all the colors of the room together. The buttons were made, by me, duh, to match the red piping.


I think it turned out, um, AHHH-MAZE-ING!!

The furniture was purchased at a consignment shop and it happens to be from Pottery Barn's Nursery line from last year. Can't beat the price we paid and for barely used furniture, it was a steal!! The colors of the room blended nicely with the warm golden hues of the furniture and when I added my grandfathers rocking chair, which I thought would stick out like a sore thumb, was a nice addition. 


Coming up with a unique way to display Landon's name was a no brain-er. I wanted dark blue letters, on burlap with red stars. The letters, stars, and burlap were purchased at Hobby Lobby. The MDF was bought and cut at Home Depot. I stapled the burlap to the back of the MDF and laid out my letters and stars until I was happy with the placement. I adhered all the pieces with my trusty glue gun, man I love that thing! Since I used the airplane mural above the bed the best alternate spot for his name plate was over the pin-board. 

After I added all the accessories, the colors pop against the wall color and really add a fun, cute visual for anyone visiting.


As you can see, their are many airplanes all over the room. I purchased several metal-model planes to put all over the room but then realized I had very little table space to place them. My idea was to hang them on the wall so they can appear to be flying up the walls. 


I love this one, it looks like it's flying out of the bookshelves.I know you can see the paper airplanes dangling in the forefront of this picture. It's Landon's mobile that isn't like any mobile you've seen. I didn't want your standard, fluffy, music, animal ridden mobile. I love this abstract piece of art the sways when the fan is on to mimic perfect flight. I also love how it casts a shadow when the lamp is on. 


It hangs right over the center of Landon's crib and at times we can catch him staring at it. I don't know if it's from interest or because he's a baby and babies can't really see much...

I mentioned the rocking chair earlier and I want to share some background information on it. My brother and I were both rocked to sleep as babies in that chair. I was held the whole time I was suffering from a bad case of chicken pocks and my grandpa only stopped when it was time for me to sleep. It has many memories and it was the first chair I thought of when planning out the room. I also hand made the pillow that sits on it! :)


I double stuffed the L for a 3D effect and used burlap ribbon for a fringe look on the edge of the pillow. Amazeballs. 


I wanted to add a cornice board to his curtain panels so I could attach this really cool airplane plaque. I wrapped the cornice board in a felt chocolate and then screwed in the plaque. I think it really gives his window an extra touch. I also spaced out the cornice and panels to make the window look larger than it really is. 


Landon's changing table was just that, a blah changing table. I added baskets, duh easy, to the shelves but that didn't do much for me. So, onto ETSY, I found cute red painted chalkboard airplanes to hot-glue onto the front of each basket!! To DIEEEEEE.


To finish up the room, I found cute accessories from Target, Antique Stores, Marshalls, Hobby Lobby and some pieces from our childhood.


Thoughts?

His bathroom is next, here's a hint...


:)